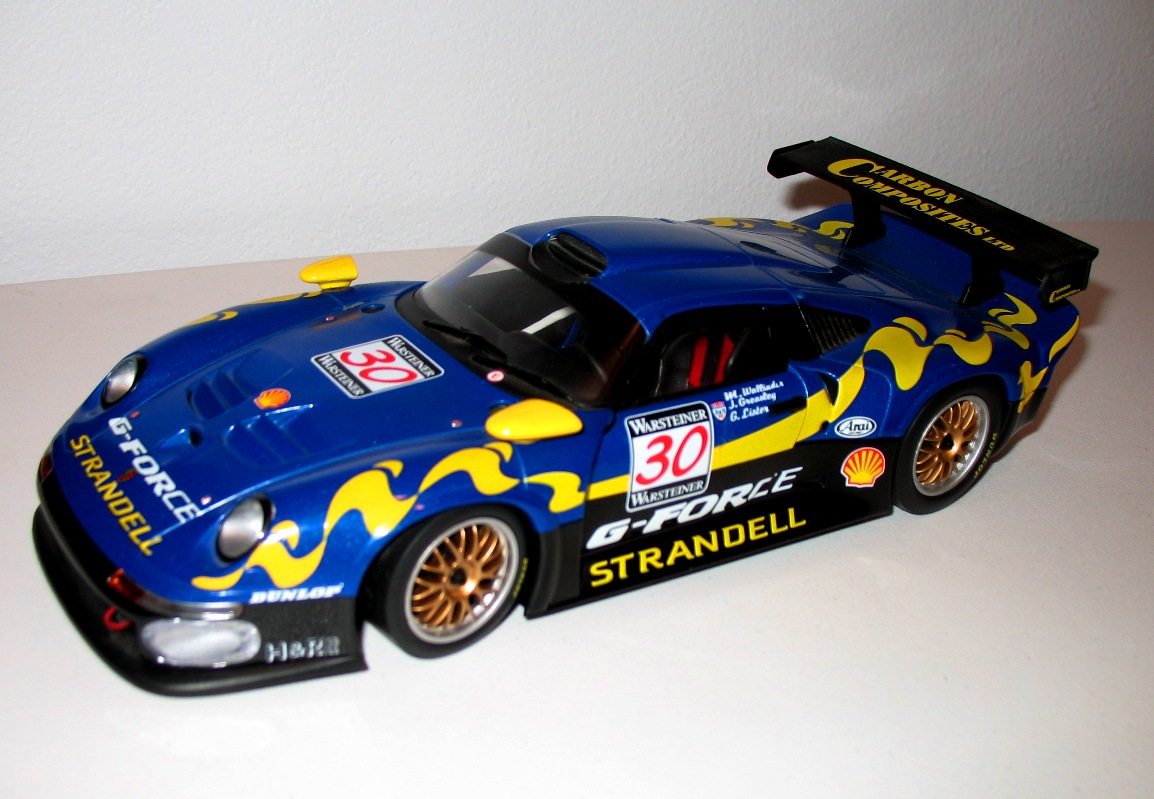
1/18 Scale Porsche G-Force Racing Team Model, purchased at the Leguna Seca Historics Race in 1998
(A. Peffley photo)
Automobiles, motorcycles, boats, planes, and trains have interested many of my friends and family for decades. All of these modes of travel have been replicated in scale models. Scale models provide children and adult motorsport enthusiasts with an opportunity to own a piece of motor vehicle history without the expense of owning the real thing.
The pleasure in collecting scale models comes from enjoying their smooth aerodynamic shapes, a wide variety of vehicle types, the accuracy of modeled details, and some vehicle's bold livery colors (like the colorful Porsche race car model shown in the photograph above.) The challenge is to find the scale models you want to collect and trade without flooding your home or shop with too many models (and staying within your allocated budget for buying the models.) CAUTION! - The pastime of purchasing, storing, and maintaining (dusting, etc.) motor vehicle collectibles can become habit forming. It can be a hobby addiction that involves frequent road trips to swap meets, antique malls, hobby shows, and the toy department isles at your local retail stores. Collectible car models can also make nice gifts to friends and relatives. When you want to downsize your collection you can give them away as gifts, or you can purchase a display table spot and sell them at a local swap meet.
WHY I COLLECT MODELS: I've had a life-time interest in high performance motor vehicles. My son had this same passion for machines and motor vehicles. Rob became an excellent automotive paint technician, car restoration and german performance cars enthusiast, motorcyclist, and a scale model cars collector. We have been blessed with the opportunity and resources to participate in motorsports as well as collect and enjoy scale models of motor vehicles we like and find interesting.
Motor vehicles sustain our commerce capabilities. Their use also directly influences social evolution, politics, and earth and outer space environments. They are amazing, complex systems for people to use and enjoy. My airplane, military vehicle, and space transportation system collectibles remind me of my military service days (Naval Air) and work on aerospace programs at Boeing. I had the unique opportunity to work on many interesting defense & space programs during my aerospace industry career. During the mid to late 1960's I worked as a part-time employee at Alan Green Chevrolet while attending high school and college. I owned several old Chevy hot rods and foreign-made sports cars (British & Italian) during the 1960's.
As a result of those life experiences, it has been fun for me to collect a wide variety of aerospace, sportbike, hot rod, and sports car scale models over the years. My vehicle models range from 1/200th scale (space rocket system models) to 1/18th through 1/87th scale items (mostly die cast cars and HO train models). I also enjoy building a few plastic aerospace and car model kits when I have the time for them in the stormy weather months during the winter.
NEW!
I have begun collecting 1:43 scale endurance racing sports cars after we bought the Ford v Ferrari movie during the 2020 lockdown. I have been collecting Le Mans and Daytona podium diecast cars I bought from dealers all over Europe and the US. I like the Spark diecast models the most for their very realistic detail features and high quality craftsmanship. These diecast car models are all hand-assembled and painted. The 1:43 scale models that I buy don't have opening doors. The 1:43 scale collection takes up far less room than their 1:18 scale counterparts.
The 1982 Rothmans Porsche 956 racecar model below is produced by Spark (a French diecast car model manufacturer that produces hand crafted 1:43 scale models in Macau, China.) the buyer is required to apply the Rothmans decals to the model because the EU has outlawed any products that have tobacco company names on them. The Spark decal kits that come with the models are very high quality and easy for me to apply because I have been applying decals to HO train models for years now. International governments legalize marijuana product logos but ban cigarette logos on little model cars of real prototypes that ran those liveries in the early 1980's -- go figure...
Photo of a Spark 1/43 scale, 1982 Le Mans Porsche 956 diecast model car with Rothmans livery decals installed on it by the collector.
COLLECTING ON ROAD TRIPS: My wife and I have gone on road trips to Leguna Seca to watch international sportbike and sports car races. My friends and I have traveled to Seattle and Portland International Raceways to attend Sports Car Club of America, drag racing, and sportbike road racing events. I have enjoyed many memorable road trips with my family across our great nation to famous race sites like Leguna Seca. Many of those trips fueled my enthusiasm for collecting scale models of colorful sports cars and motorcycles. The models often remind me of enjoyable family road trip adventures. It is easy to send scale model vehicles home on a road trip. If you don't have room in your travel bags to carry your purchases back home, then you just mail them back to your home address from a nearby post office during your trip.
MEETING NEW FRIENDS: Looking for collectibles provides the collector with many opportunities to meet new acquaintances along the way, and even renew some old friendships. Collectibles can remind you of special people relationships you have formed and spontaneous fellowship opportunities you may have experienced at special motorsport racing events or during the old days of cruising hot rods while in highschool. During our participation in motorsport events and scale model swap meets (selling and/or buying) we have developed and maintained long-time personal relationships with new-found friends. We also enjoy the adventure in finding unique scale models and learning more about the real machines that they represent. My wife and I both enjoy going to car and model train swap meets, looking at the large variety of items being sold, and finding a few collectable "treasures". Most of all, we like meeting new people and visiting with our friends that have similar motorsport interests at swap meets. Sometimes just the road trip experience is fun even though the swap meet may not yield any new "treasures." In the spring of 2018 I took a trip to Lewiston, Idaho to visit a good friend and attend their annual train show. My friend had never been to a model train show before the event and he enjoyed going there with me to look at the trains.
LIFETIME HOBBY: Collecting models of motor vehicles can be an enjoyable hobby from childhood through adulthood. Many people develop an interest in motorized machines in their early childhood. Some people invest in vehicle scale models so they can make money -- they store them in their original packaging and sell them for a profit to other collectors. I like to take the models out of their retail packaging, display them, and see them in three dimensions to truely appreciate their detail, beauty, and functional features. On many larger-scale car models the front tires turn with a rotation of their miniature steering wheel. Some of the scale engines even have miniature spark plug wires. Model car hoods or rear lids (Porsches and mid-engine car models) may also lift up to provide the enthusiast with a complete view of a detailed racing or stock engine. Most of the higher-quality car and motorcycle models have a metal chassis, rubber tires, and a body equipped with accurate interior and exterior accessory part details. Vehicle scale model sizes I especially like to collect and enjoy are: 1/200 (rockets and manned space vehicles); 1/100 (mostly ship and airplane models); 1/87 (HO train scale items); 1/64 (typical Mattel Hot Wheels size models); 1/43, 1/24 and 1/25 (motorcycles and sports cars); and 1/18 (model sports cars). I enjoy discussions and sharing the information on the scale models in my collection with my grandchildren. Every kid loves a toy!
HO SCALE TRAIN LAYOUTS & MODELING
I have purchased enough 1/87th scale HO trains, vehicles, people, buildings, track, scenery, and accesories for a fairly good-sized HO scale train layout in our home basement. We have built holes in the divider wall of our basement to form two scale model tunnels that will link a tabletop layout in the hobby room with a functional shelf layout (over the couch) in the family room. The tabletop layout will include simulations of several Kalama and Longview industiral sites. The shelf layout will be modeled after the main line tracks in east Puyallup near the ADM corn syrup depot, a specialty machine shop, and the pallet factory. As of 08 May 2021 all four hobby room layout modules are completed and the DCC wiring will be installed later this year after the track is laid on both the table and shelf layouts. I have posted some new pictures the larger Hobby Room (Kalama) layout. I will post photo of the mounted shelf layout in the family room after we mount them to the wall. The three shelf modules will be installed after the track is down on the Hobby Room layout to make sure the two mainline tracks align correctly with the tunnels. and the desired shelf layout width and height off the floor in the family room.
Because of the massive size of the real grain elevator facility in Kalama (I'm modeling the older facility right next to the I-5 freeway with the older "Harvest States" sign on the grain elevator), I had to shrink the scale and quantity of prototype storage elements of the simulated grain transfer facility to fit available space on my hobby room tabletop layout (and still have room for track!) The scene will include a mural photograph of the Oregon hills across the Columbia River from the elevator facility on the back wall and a scale model of a bulk commodities freighter ship being filled with grain. I have collected satellite and aerial photos, taken digital photographs, and collected a lot of Internet information to plan and to simulate the facilities' location scenery I wish to depict in my two basement layouts (see my photo of the Kalama grain elevator facility photo below). The primary project challenge is not to get too hung up on detail in building the layout's modular sections. I want the layout to be somewhat realistic-looking, fun to build and operate, and easy to maintain over the years. The two mainline turn radius sizes will be 28 and 26 inches to fit the layout surfaces, tunnels through the wall (see preliminary layout concept drawing below), siding & yard track plans, and scenery features. The layout tops will include a Homasote top layer to reduce model electric train noises. I plan on using the Digitrax DCC system with three operations "districts."
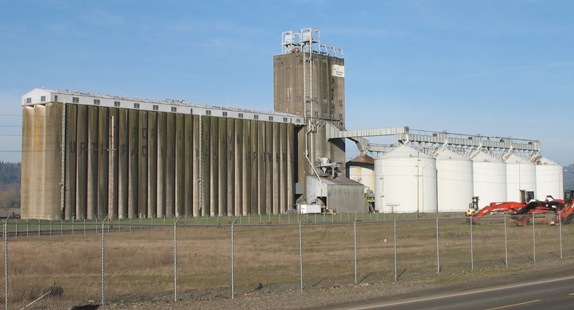
Kalama [former Harvest States] CHS Grain Terminal Facility in 2008 (Credit: A. Peffley photo)
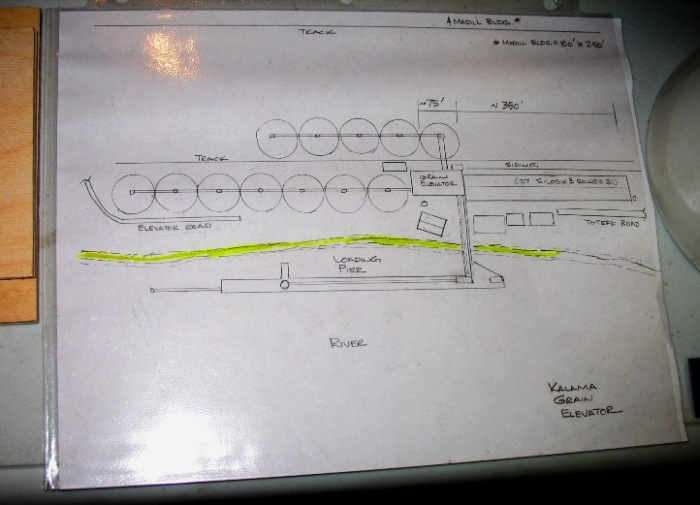
This sketch was my first Layout Concept Drawing for the grain terminal model -- my "Think Like daVinci" sketch. (A. Peffley photo)
It was obvious after I made this sketch in 2009 from satellite photos that the huge facility was too large in HO scale to fit my 12-foot long layout table!
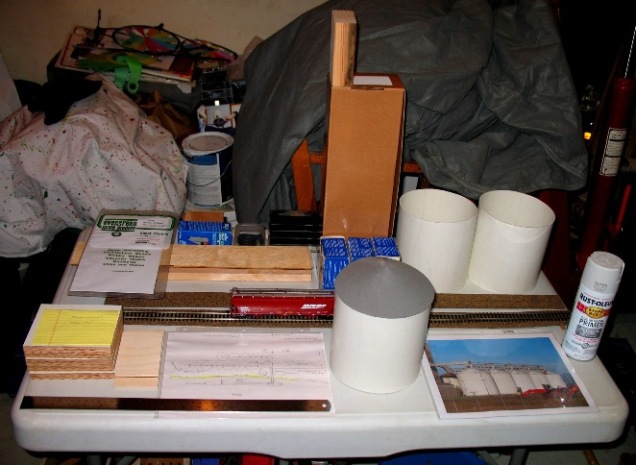
January, 2015 - Partial, reduced scale mockup of Kalama Harvest States Grain Terminal - Circa 2008-10 (A. Peffley photo)
The modeled concrete-column grain bin rows and the head house over them are not shown in this partial mockup picture.
There will be 9 or 10 large grain bins (see three 6-in. diameter bins shown above) instead of 12 to make the model fit my layout design.
HISTORY OF MODEL RAILROADING: I have built several model train layouts in HO scale since I received my first HO train set for Christmas from my parents in 1953. My father helped me build a 4ft by 8ft table top layout in a spare bedroom inside of our garage. I ran my trains for five years in that garage room before my parents sold our house in 1960. I still have some of the train set pieces, track, and scenery items from my first HO train and that original layout. I also experienced many hours of enjoyment with my children operating HO train sets in our home over the years. We expanded my childhood collection of HO train set pieces and components to include a few more interesting scenery features and several switching engines for the small layout. The informal HO layout was set up in a basement room area of the family house, and my children liked to play with it.
CURRENT HO TRAIN LAYOUT PROJECT: My interest in model trains as a hobby has also given me the opportunity to meet some really nice people. I also have taken some interesting digital photos of real world locations to be modeled on our new basement layout. My photo collection outings to take pictures of actual railroad operation locations to be modeled have enabled me to learn more about the companies located next to the siding and mainline tracks. I always try to obtain permission from each site's office personnel to photograph their industrial business facilities (you don't want to end up on a local Homeland Security Events Watch List!) I have taken many good digital photographs of industrial facilities next to the Kalama, Longview, and Puyallup rail lines for layout planning and creating HO scale model simulations of the current industrial facilities. The old Kalama Grain Terminal facility was built during the mid-1960's by the Harvest States agricultural products cooperative. I also have a lot of photographs of locomotives and rolling stock that I have taken over the last three years. Featured railroad lines will be BNSF, Santa Fe, Great Northern, Northern Pacific, Burlington Northern, Frisco, Portland & Western, and the Sounder commuter pasenger trains. Portland & Western carries a lot of logs, chemical tanker car loads, and lumber products. BNSF runs mixed commodities trains, grain trains, and coal trains through Kalama. BNSF runs lumber product and corn syrup trains through the section of Puyallup tracks I am modeling, as well as operating the Sounder trains for the regional Sounder commuter transit system authority.
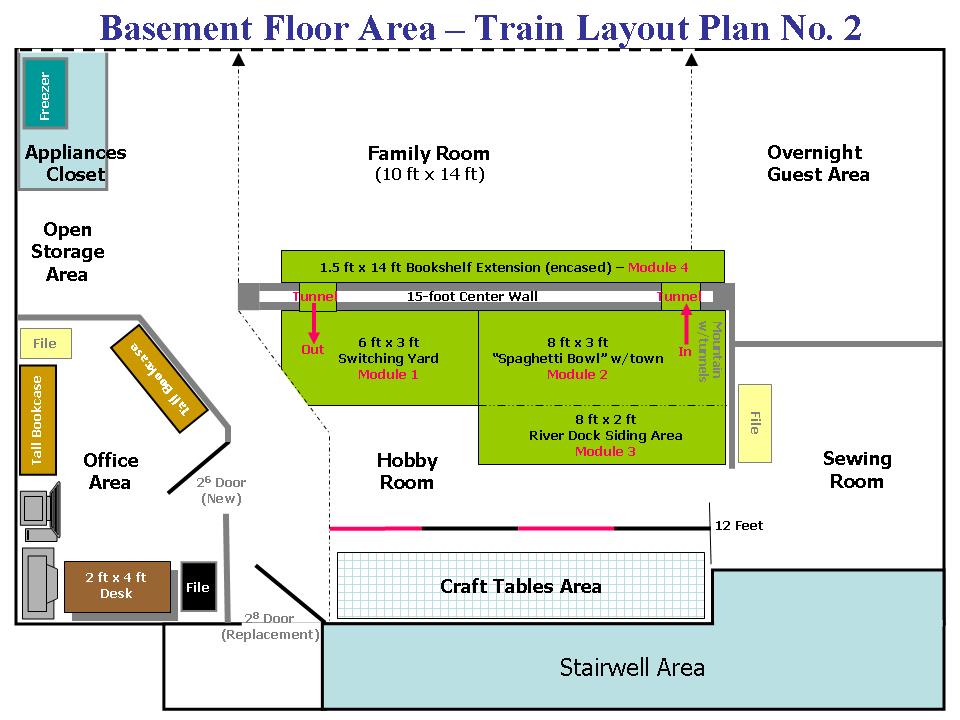
Selected Draft Floor Plan for Current HO Scale Model Trains Layout in Basement - 2009 (A. Peffley drawing)
The Hooby Room layout #1 Module now butts up against a straight wall that replaced the angled wall in the drawing above; Craft Room layout is now 4 X 12 feet.
Just like in theater movies, practical model train layouts are designed to give visitors and model train operators the visual illusion effect of being at the modeled location without requiring the layout to be the same scale throughout its composition. The layout designer is not required create true scale model sizes for all of the prototyped industrial facilities or simulated "mainline" features. Facilities and scenery I select for the layout must be designed, modeled, and integrated by me to fit within the planned space for two, tunnel-linked industrial area layouts in our basement (see the layout floor plan shown above.) I will share a few pictures of my train layout design and build-ups here as I transition my project development plans into a finished HO scale train layout in our basement. The angled end wall in the Hobby Room drawing above ended up being installed as a straight wall, so the module shown as 6ft x 3ft "Switching Yard" area on the layout will be a conventional rectangular shape. The hobby room layout is now comprised of four 3x4 foot modules (a 12x4 foot layout.)
I set up a second crafts work table across the room from my first work table. I want to set up a lighting track bar with specialty lamps for illuminating the large train layout surfaces and a backdrop landscape wall mural in the hobby room (made by "stitching" actual photos of the Oregon hills and shore side of the Columbia River at Kalama together.) The large layout backdrop wall was not textured in order to smoothly glue the custom-made, scaled photgraphy mural on the wall's surface. I found a vendor at the 2015 Portland NMRA National Model Train Show that will make my mural backdrop for the Kalama layout room.
The locomotives and rolling stock inventory has grown significantly over the last seven years. All of the HO scale locomotives and rolling stock are now sorted in clear tote boxes by railroad/type of locomotive, freight car, passenger train unit, Maintenance of Way (MoW) equipment/cars, scenery item, construction/farm equipment, or HO scale motor vehicle. The components of the Harvest States/Temco grain terminal facility are all cut out (including doors & windows) and need to be painted before final assembly. I decided to scratch build the entire terminal instead of kit-bashing a Walthers Cornerstone grain elevator kit. I found a panel of green textured plastic door side window material at a plastics materials sales company in Tigard for the modeled Columbia River's surface. Mr. Plywood in Portland sold us the table top materials. The module end and side frame pieces are clear white pine with a tight grain to reduce warpage in a basement environment. A hitech, efficient dehumidfier keeps the humidity down in the basement.
I have all of the Hobby Room module structures completed and in place. The front end and exposed side frame pieces are finished with a light brown stain and sealing coat (the clear wood is too beautiful to paint). Quality cabinet screws were used to assemble the wood frames. We bought a better Bora 551025 corner clamping tool from Woodcrafter for the #2-4 frames. It broke assembling the last frame. It was more accurate than the Rockler corner tools system we used for assembly of the #1 module frame. I bought pressed sound board to cover the layout top instead of Homesote (it has a more even top surface, sheds less paticulates, and it does not draw moisture or warp if attached properly to the plywood top panels.) I am still working on the grain terminal and the Freighter ship. Here is a photo of the first two modules in March of 2018 showing the large modules frame construction technique:
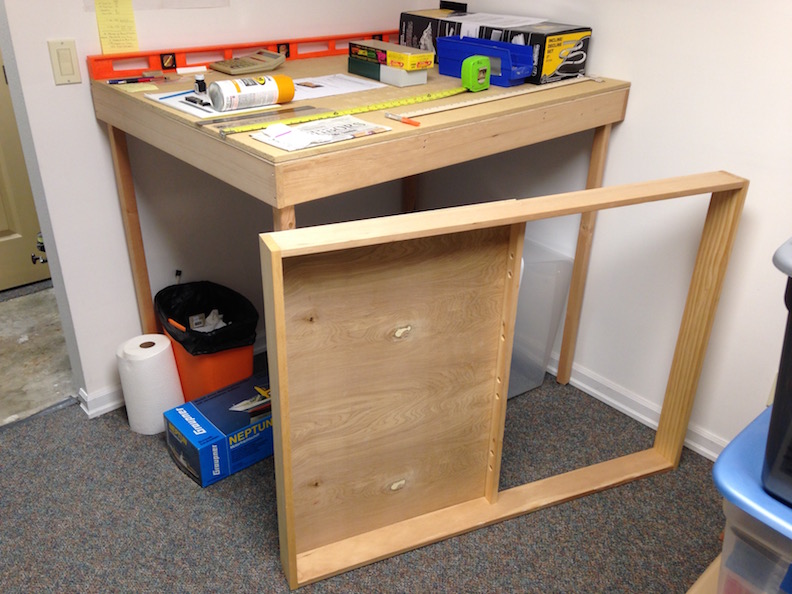
Module #1 (next to the wall) came out exactly level without adjusting leg pads (dumb luck.) Module #2 is on its side. The back half of #2 will lift out for rear layout area access.
A German-made grain freighter ship model (about 30 inches long) is in the long blue box under module #1. One of two tunnels to the next room is behind the gray & yellow box.
(Credit: A. Peffley photo)
Photo of finished Kalama layout modules assembled together with rolling stock storage containers underneath in Hobby Room is taken on 08 May 2021.
Assembled Woodland Scenics' 2% Incline foam blocks are pinned and glued to Hobby Room layout sound board surfaces; the Plaster Wrap is for incline side landscaping.
I am still trying to play "catch-up" on the Hobby Room layout construction. The DCC wiring planning has been much more complicated than I had originally anticipated, but I found some better wiring tips information on the Internet. Cell phones and iPads can wreak electrical magnetic interference (EMI) "havoc" on wires carrying chopped wave DCC signals under the layout. Wiring buses will be twisted pairs with adequate bus bundles separation.
NEW! Bonnie and I have now completed all of the module frames and assembled them for both the Hobby [Crafts] Room and the Family Room shelf layout in the basement (see above photos). I am mounting foam 2% incline blocks on the big layout for both ends that lead to the two through-the-wall tunnels. The dual track Main Line will be in the two original north-south BNSF prototype configurtion (before the current third rail project started on the BNSF mail line tracks.) This meant that I had to buy two sets of Woodland Scenics incline blocks for the two tunnels. I chose the blocks instead of plywood risers to make the HO scale 2% rise. Wire frames will be constructed along the sides of the assembled and mounted foam blocks as a structure to overlay with plaster cloth to simulate dirt & rock slopes along the 2% incline ramps to the tunnels.
I have now converted about fifteen dozen cars and cabooses with Kadee couplers, proper weighting, road number changes, wheels and trucks, and some paint modifications in the last five years. I scratch-built a CAT C-9 Auxiliary Power Unit in HO scale from photos and Caterpillar engineering CAD drawings. I showed it at the 2019 Bridgetown Prototype Modelers Meet. I have some TTX 60-foot Athearn, InterMountain, Atlas, and Roundhouse/MDC flatcars that I have built to haul CAT equipment behind a CAT/EMD locomotive (purchased from Hobby Smith). One InterMountain OTTX flatcar was especially difficult to build from a kit -- there is no place to put NMRA-suggested weights under the car (and stll retain the delicate details of the very accurate braking system for this fine scale car.)
Boat racing is done, so I can focus on the layout (and left-over house remodel and unscheduled maintenance tasks -- seems like everything is breaking or malfunctioning at once in the last eight months!) The 1958 wooden caboose car kit project is now finished. I bought a conductor figure to ride in the cupola. I mounted some track on an actual wooden window frame section from the real Northern Pacific caboose built by Pacific Car & Foundry. I have at least two years of effort into that caboose. Many of the detail parts in the kit were upgraded with better quality part and materials. The finished NP caboose is museum quality.
This hand-built, NP 10611 HO scale wooden caboose model is mounted on a display track base made from a window frame section of the real NP caboose.
(Note all of the different colors the caboose's interior was painted over its lifetime of service from NP's 1916 delivery to its early 1970's BN retirement.)
The Gallery House located above the cement silo columns of the grain terminal model still needs the roof and LED lighting I bought last fall installed. I bought LED lighting on eBay for the Gallery's interior and accessory parts for the handrails and Elevator Building machinery, windows, and venting. I still have not cut out the windows in the Elevator building yet. I bought a miniature craft saw to use with the scroll saw I used for the gallery house windows. Using the scroll saw was tedious and very time-consuming.
I hand drew a HO scale loft drawing of a Herzog Multi-Purpose Machine locomotive unit (HZGX 201). I purchased a HO scale, Thrall articulated well cars set to simulate the Herzog MPM work train well cars. I found and purchased a Japanese Komatsu excavator machine model (1:87 scale) on a Japanese eBay website that matches the one on the Herzog MPM's (thank you Mr. Yonemoto). I negotiated with a local 3-D shell producer for two resin plastic MPM locomotive shells in HO scale. I have the Proto 2000 GP9 frame for the locomotive end (the real Herzog MPM 201 employed a GP9 frame and updated prime mover powerplant.) I have a large collection of Herzog MPM photos that I have taken in Cowlitz and Pierce counties, as well as extensive research information on Herzog systems. The Relam/Herzog modification plant in Iowa was where MPM 201 was custom-built to Herzog specifications. Herzog is not willing to share their MPM blueprints with me, so I had to develop my own HO scale hand-lofted drawing from numerous photographs. I was pleased with how the shells turned out for this model projects. Dunstan did an excellent job producing these two MPM shells for me.
Here is a photo of the cement silos and gallery house (minus roof panels) for the CHS Kalama Grain Terminal being modeled (circa 2008-10):
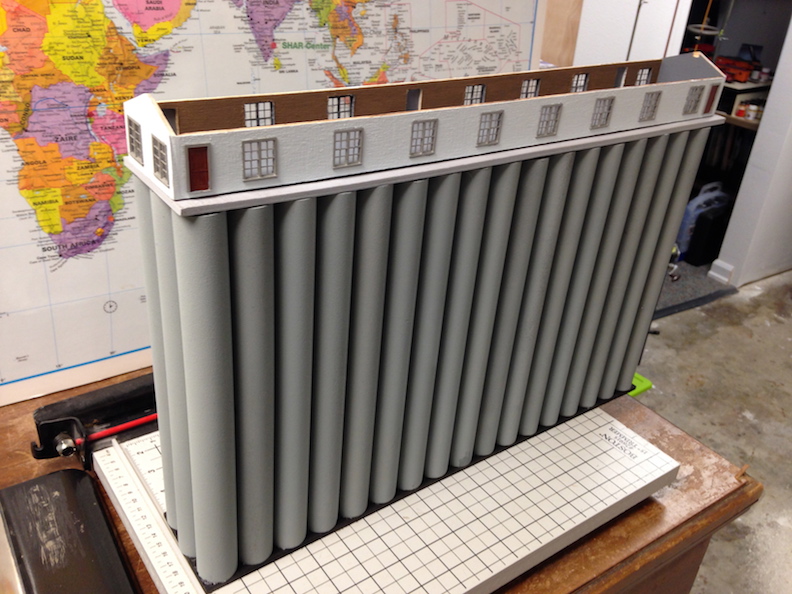
Number & diameter of cement grain silo cylinders had to be reduced to fit my modeled CHS Terminal Facility components onto my reduced terminal facility area.
Gallery house colors match the real building colors as close as was possible. Cement silos will be letter decaled & weathered later (see 2008 facility photo above.)
(Credit: A. Peffley photo)
Layout Construction - I still need to lay out track patterns for the grain terminal's service yard track and build the roll-away DCC control console cart. The large layout table top in the hobby room is 42 inches off of the floor level. The module legs have screw in and out, adjustable leveler pads (which I purchased on eBay in 2017) that adjust for inconsistencies on the basement carpeted floor surface. They work great and the Free-mo (Google freemo.org) guys and gals use the same legs on their standardized free form modules they assemble at train shows like the setup I viewed in Idaho. These adjustable pads have proven to be a wise investment for leveling the larger layout sections. The family room modules will be suspended by special wall mount brackets with rod insert connectors that slide into receiver brackets mounted on the three narrow shelf layout modules.
Each layout module frame is set up to accomodate a top end, Digitrax "Super Chief" DCC train control system where you can assign a digital command address for each locomotive with locomotive decoders. The system will control special scenery lighting and motorized turnouts for ingress and egress to sidings and the grain terminal yard. I bought the premium Digitrax Super Chief DCC layout control system in 2014. I am still working on wiring integration drawings for installing the required wiring zone cable busses and module interface connectors (I'm using Anderson Powerpole connectors) for each module. The wiring integration design requirements and specifications have been completed so that the number of components and cables are easy to monitor, maintain, upgrade, and repair when the modules are assembled into one integrated table layout structure. I purchased barrier strip terminals from Radio Shack in 2015. I bought my 14-12ga spade connectors from an electrical parts jobber. The wire gauge for the mainline busses is larger than most people buy for their train layout projects. I received a lot of technical help from Mike at Mainline Trains with designing my layout DCC districts and buying the right wiring materials for the layout module wiring and comand system components. Several Mount Hood Model Engineers members have also been very helpful in assisting me in layout construction decisions and DCC setup choices (thanks, guys). In 2017 I bought a high-end, Digitrax power supply unit with a controllable output and accurate meter to provide protected and consistent power to the Super Chief DCC Controller and zone components.
I went to several Mount Hood Model Engineers club meetings in 2015 and discovered some great ideas for modeling the Columbia River waterway at Kalama usng green plastic door side window panel from the 1970's. I also received tips on airbrush painting and track laying from the club. I purchsed a Paashe compressor and double action airbrush set in 2017. Like the details of completing the inside of a new home, the new layouts' landscape and scenery accessories are quite expensve and time consuming to find on the Internet and in [still survivng] model train stores. Mike at Mainline Trains closed his Forest Grove retail store in 2014. I still really miss his Forest Grove store, but I also understand the problems with finding the best location to attract customers and the competition from eBay/manufacturer Internet sales by sellers with lower overhead and operating costs per unit sold. I still do a lot of business now with Whistle Stop Trains and The Hobby Smith in Portland, as well as many sellers on eBay. eBay is becoming more expensive for sellers to sell their products, and there are a lot of sellers who try to sell used items as new items. If you call them on false advertising, they usually give a partial or full refund. Many times it is less expensive to buy new products on a seller's website than from their ads on eBay. The many different local sales tax rates in Washington State are frustrating to online sellers and eBay sometimes charges a higher Seattle area rate depending on how the transaction is routed through network servers.
Railfan Photography
I have taken photographs of over 250 BNSF locomotives from Centralia to Albany, Oregon, on the I-5 corridor. I have also taken shortline photos in La Grande and Island City/Elgin Oregon yards. I use prototype photograhs of real railroad equipment to model details on my BNSF, Portland & Western, Central Oregon & Pacific, Great Northern, Northern Pacific, Southern Pacific, and Sounder model railroad fleets. I now have an organized railroad picture archived database on Excel spreadsheets of my digital photograph files (taken by me or downloaded from the Internet.) I have photographed these railroads for almost every model of locomotive and type of rolling stock car I have collected in HO scale (including Maintenance of Way equipment and cars.) All of my photographs are taken with an inexpensive, 5-megapixel Cannon digital camera, or my Apple iPhone if the Cannon camera isn't at hand when the opportunity arises while traveling.
I am preparing a modeling project of the La Grande, Oregon UP yard with a Jordan Spreader, Flanger, and MoW work caboose in HO scale for a future Free-mo module. I have all three MoW units, I just need to paint two of them in correct UP colors and build a Free-mo module. The Free-mo groups are loose-knit organizations with no formal "club" to join or pressure to participate. You just show up at a train show with your module that must conform to the standards they publish. The Free-mo participants seem to have fun together with minimal stress. The 7th Annual 2018 Clarkston/Lewiston Train Show had a huge Free-mo layout and I learned a lot from them in reference to my four basement modules connections. Verrry cool!
Here are two photos I took at Kalama, WA and St. Helens, OR locations that I have used for modeling the Portland & Western:

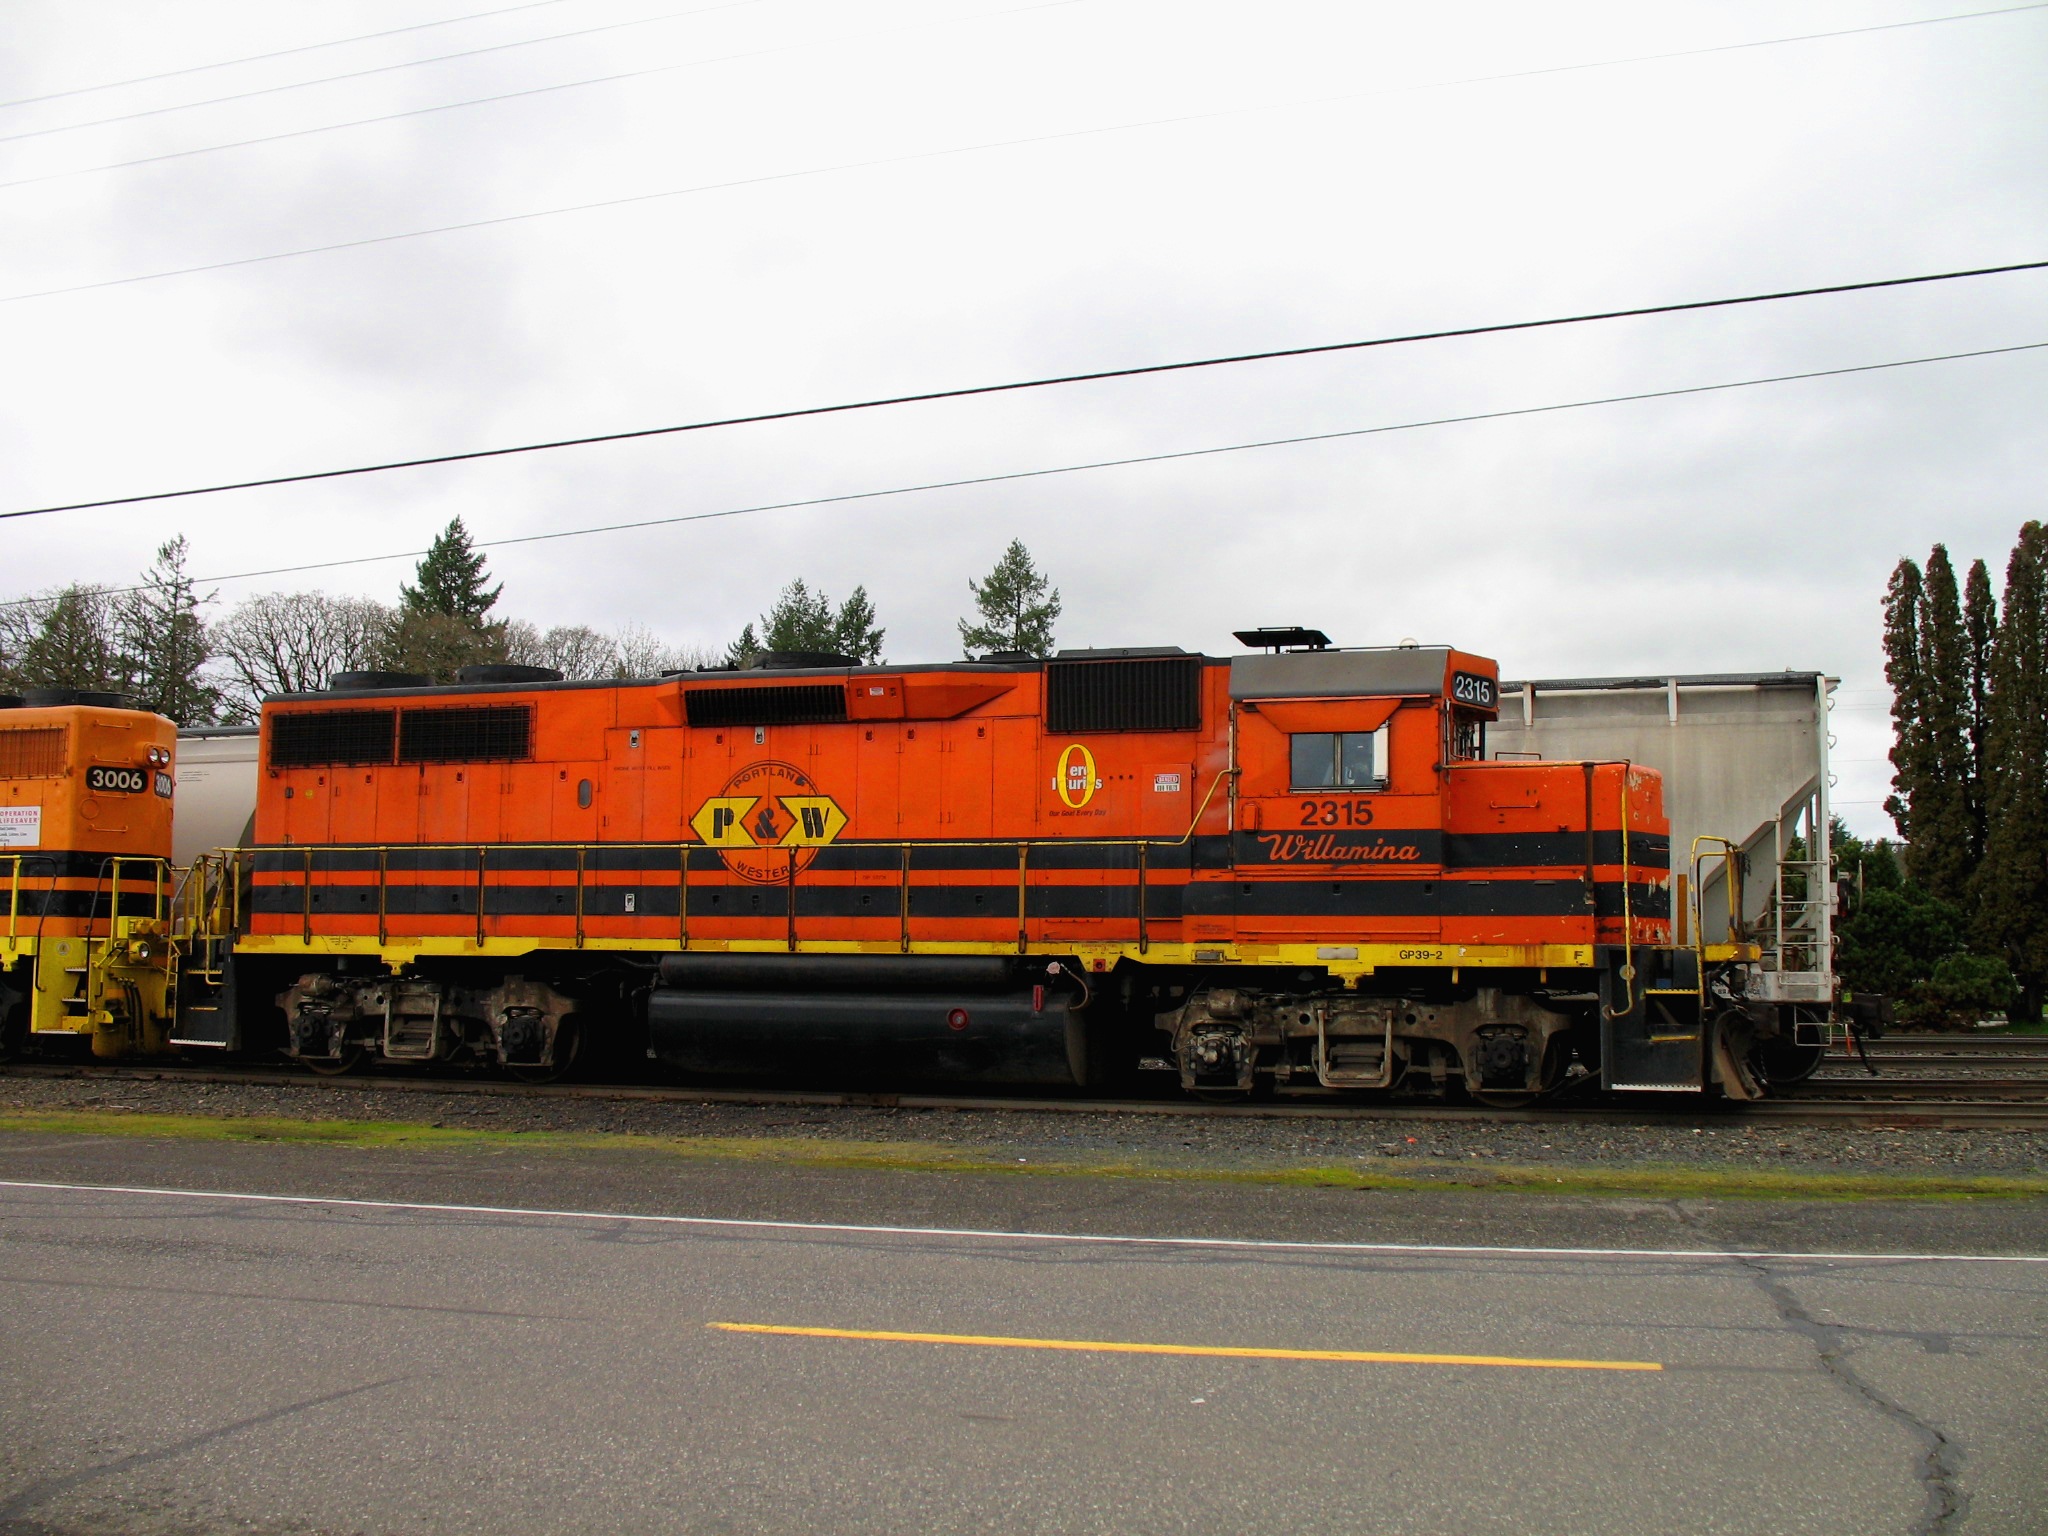
BNSF Heritage NP Logo Trinity 5161cf Covered Hopper at Kalama (Feb. 2018) Portland & Western Willamina GP39-2 EMD Road Switcher at St. Helens (Feb. 2018)
In 2017 I purchased an excellent Athearn HO scale PNWR Willamina locomotive operating model. It is much more accurately made than the previous PNWR models released by Atlas. I saw the Athearn preproduction model at the NMRA 2015 National Show in Portland and ordered one from Ron at Hobby Smith when the opening of advanced reservations were first announced by Athearn.
I have been taking digital photographs of railroad operations and equipment for over eight years now. It is fascinating to me to see how many changes and updates the BNSF and other NW railroad shops and subcontractors have completed on their EMD road switcher units (GP & SD series locomotives.) New GE and EMD prime mover locomotives produce up to 8,000hp and get better fuel mileage than the SD40, GP50, and GP60 units they replaced on mainline train routes. I am especially interested in photographs of railroad equipment that fit my layout theme and time periods (1980's to present). The problem is my HO trains collection is getting too large. It is hard to "scale down", but when the train swap meets start again I will divest of my old rolling stock and unused layout scenery. I was very successful at the LK&R club's swap meet at Kelso in 2019. They hope to have a show in September of 2021.
My favorite locations for taking color photography still pictures of trains and locomotives are: Kalama mainlines and sidings (including the grain terminals' sidings); Longview Yard; Kelso mainlines & siidings; Vancouver BNSF Yard; Centralia PSAP siding next to I-5 (now fenced off); Portland BNSF Lake Yard; Albany P&W Yard; St. Helens P&W mainline and sidings; Deer Island & Rainier Yard P&W rails; Elgin Terminal & mill mainline (Idaho & Northern Pacific); La Grande Yard (UP -- see photo below); I&NP Island City Yard; Kelso BNSF mainline & Rocky Point Yard; and anywhere the Portland & Western or BNSF operates. I will post a couple of my favorite BNSF and P&W photos here in the near future. Here are two photos of the UP Maintenance of Way consist at La Grande with new paint jobs (flanger, Jorden Spreader, and bay window caboose in June, 2017) and Hertzog's HZGX 201 Multi Purpose Machine locomotive (parked at Kalama, WA in July, 2016.) All four MoW units shown in these two photos are being modeled for my home layouts and a future Free-mo module. The MPM consist is only about 50% complete. I have all of the UP units in the photo. I bought a 1960's HO scale brass model UP/SP flanger car from a model train collector in Russia. The Jorden Spreader was purchased on eBay from an estate sale. The ready-to-run HO scale bay window caboose was manufactured by Atlas and I upgraded the livery paint details to match this caboose in the photo below. Atlas and Athearn Genesis make some very fine plastic scale model cabeese. I will scratch build the modernized front cab of the Walthers Jorden Spreader unit (still is a back burner project.)
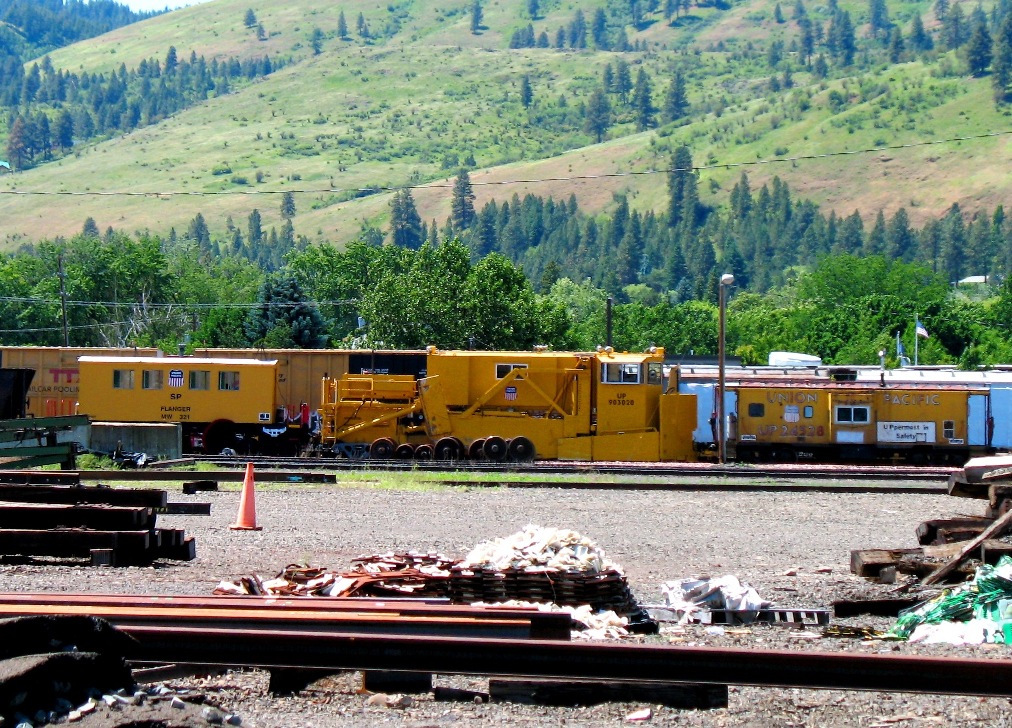
These three upgraded MoW units are used every year when it snows to keep the Union Pacific right of way mainline tracks clear for trains going east and west over the Blue Mountains.
The Jorden Spreader is self-powered, but the consist is often pulled or pushed by an EMD SD40N road switcher (or two) during heavy snow storms. (Photo Credit: A. Peffley)
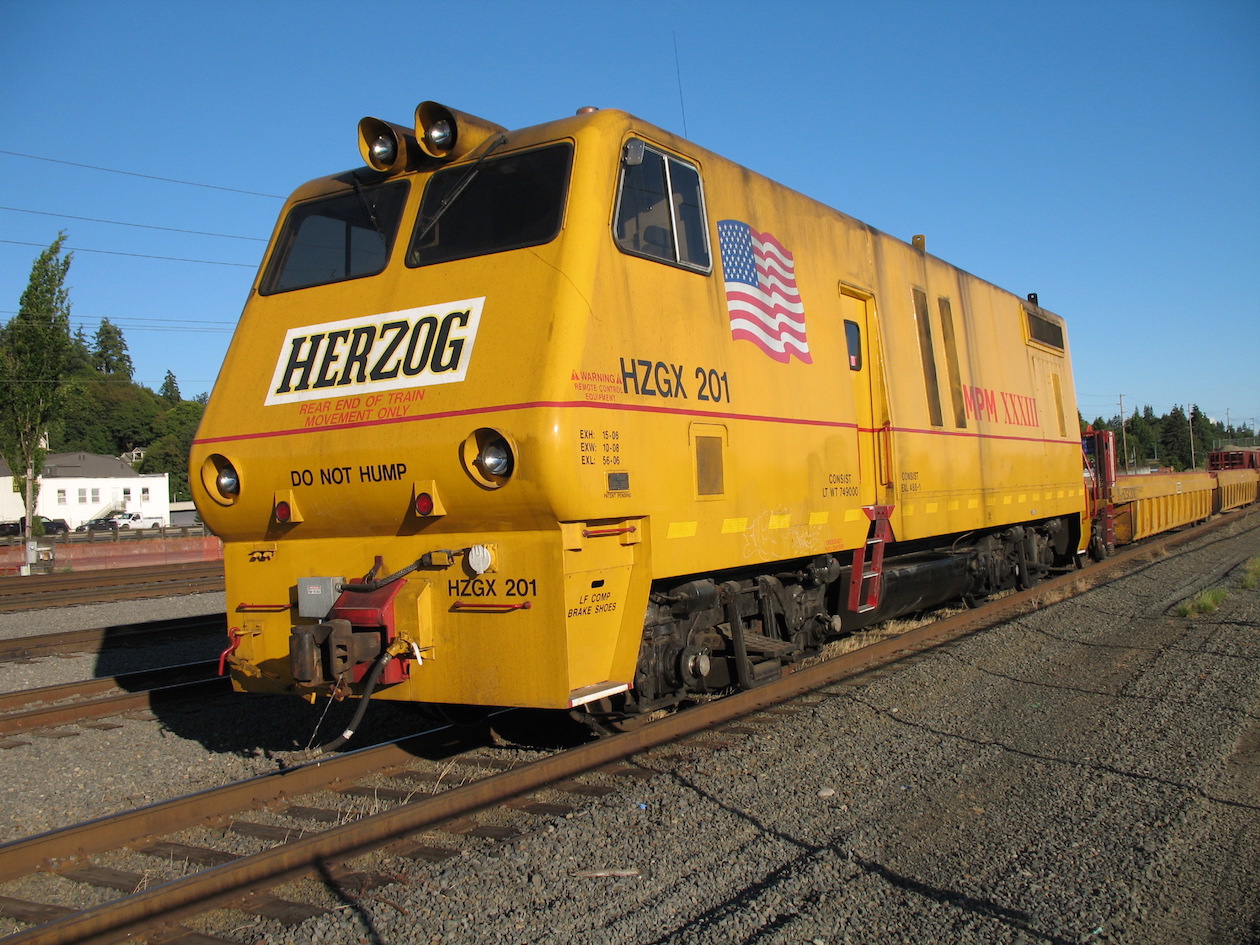
Hertzog's Multi Purpose Machine (MPM) XXXIII (33rd MPM built), HZGX 201 locomotive (ex-GP9, totally rebuilt to Hertzog specs in May, 2012 at the RELCO plant in Iowa.) Here it is parked at Kalama, WA, in 2016 on a hot summer afternoon in July. The MPM's are crewed by only one or two technicians for each job. BNSF hired this MPM to work on a new, Federally-funded third rail mainline. The third rail mainline was funded by the US and Washington State DoT's to support more AMTRAK passenger train traffic on the heavily-used BNSF north/south mainlines.
(Photo Credit: A. Peffley)
SPECIAL PROJECT - Herzog Mullti-Purpose Machine (MPM)
I attended the second national Bridgetown Railroad Prototype Modelers Meet at the PDX Shilo Inn in February, 2019. I met a 3-D printing expert and HO modeling guy at the meet, and we struck up a friendship. We both displayed electrical power equipment loads on HO scale flatcars and custom transport cars (his custom, large power equpment transport cars are awesome!) I brought my 2016 Caterpillar C9 Generator Set model that I scratch-built in HO scale, as well as a large SPX transformer kit-bashed built from a Walthers Westinghouse transformer kit. He 3-D printed a large Siemens electrical power station transformer for his custom transport car.
The prototype modeler I met, Dunstan, is a specialty engineering engineer who is an expert in 3-D printing of new development parts at a Portland company. He produced 3-D CAD drawings from my 1:1, HO scale 2-D profile drawing that I lofted in pencil media. He also used many photographs I took of the prototype MPM XXXIII's HGZX 201 locomotive (shown in the photo above.) I also provided to him a donor, Life Like Proto NP GP9 1/87 scale locomotive frame. He made two 3-D printed body shells that fit snugly on that metal frame for me in about one month. During the four weeks of shell concept development we both proofed the CAD drawing files several times until we were satisfied with the final design. There are some limitations to 3-D printing, given the available printing equipment object size limits and the selected plastic media spooled string material. Resin-based materials were just too expensive for a low budget HO scale locomotive special project like mine. The HZGX 201 body shell detail add-ons will be created by me. The body will be sanded, filled, and painted by me, as well as my producing Herzog decals from my prototype photos. Herzog will not share their layout files with people outside their company and manufaturing partners (like Relco in Iowa who produced the MPM XXXIII for Herzog.) This was a dream come true for me, especially after searching almost three years for a producer of an one-off HO scale 3-D printed shell body. I had no luck finding a developer amongst the half dozen small HO and N scale individuals on the Shapeways website that do custom work like this. One guy on Shapeways website produces a MPM locomotive in N scale but he produces a different MPM locomotive design, and only in N scale. I have updated this section to include photographs and graphics of the MPM shell development. The first photo taken by me shows my drawings with Dunstan's CAD rendering and the two HO scale MPM shells that he produced with my original, hand-lofted 1:1 scale two dimensional drawing. I delivered to Dunstan the HO scale Proto GP 9 locomotive and he 3-D printed the body shell to fit onto that frame. The second shell fits better than the first one. Both shells are very good quality. I still need to model the two headlights on the cab roof and use Tamiya putty to smooth out the body shell surface irregularities caused by the deposition process used in 3-D printing. As I said, I am very happy with the results so far.
MPM Project Modeling Photos from May 2019
Shell No. 2 (white) is mounted on the Life-Like Proto GP9 frame & No. 1 printout (fuscia shell) are shown with my original drawing & Dunstan's 2-D drawing.
The donor Life-Like Proto GP9 frame is shown without the original NP shell in this photo. The MPM shell was designed to fit this motorized frame.
This CAD 3-D image rendering of the HO scale MPM No. 1 body shell was produced by Dunstan os a check file before 3-D printing was intiated.
The No. 1 MPM body shell was fit-checked with the motorized GP9 HO scale frame before body shell No. 2 was printed.
The under side of the first body shell is shown in this photo. Body shell number two had a better fit with slight modfications.
[Last Updated 08 May 2021.)
© Copyright - Excalibur Racing Team 2011-21, All Rights Reserved